Wireless communications for IoT
The internet of things and the massification that has been seen in recent years present new challenges for technologies, especially for wireless communications. Since most IoT devices must be “self-contained”, it is practically impossible to use wired networks for communication. Also, another point to take into account is the energy consumption. Because most IoT devices must be battery operated, it is crucial in their design that communications do not consume too much power stored in the batteries. As a consequence of this, some advancements and new developments have been made in wireless communication technologies. Many of us have heard about Bluetooth, which is suitable for some applications but unsuitable for others due to its technical limitations. New protocols and technologies like Zigbee and MQTT have also emerged.
This entry in my portfolio explains how I used MQTT to connect a Huzzah Featherboard to a Raspberry Pi using my iPhone as a hotspot (later will be explained of why I used my iPhone instead of a traditional router / Access Point)
MQTT
MQTT stands for Message Queuing Telemetry Transport, a standardized publish-subscribe messaging protocol. It works on top of the TCP/IP protocol. MQTT is a publish/subscribe protocol that allows edge-of-network devices to publish to a broker. Clients connect to this broker, which then mediates communication between the two devices. Each device can subscribe, or register, to particular topics. When another client publishes a message on a subscribed topic, the broker forwards the message to any client that has subscribed.
MQTT is bidirectional and maintains stateful session awareness. If an edge-of-network device loses connectivity, all subscribed clients will be notified with the “Last Will and Testament” feature of the MQTT server so that any authorized client in the system can publish a new value back to the edge-of-network device, maintaining bidirectional connectivity.
I am going to use a Huzzah Featherbord and a Raspberry Pi to be both publisher and subscriber (to prove it works), but for the final application, the Huzzah Featherboard will act as a publisher only.
[Image - Network Diagram]
Setting up Huzzah Featherboard and Raspberry Pi
The process consists of:
- Set up the Raspberry Pi to create a MQTT server and client
- Set up the Huzzah Featherboard to create a MQTT client which will connect to RPi server
- The Huzzah Feather board will connect to MQTT Server and send information to it
Raspberry Pi
First, we need to install all dependencies and libraries required. I used Mosquitto as the server and client for the RPi. To install it, I followed instructions from here.
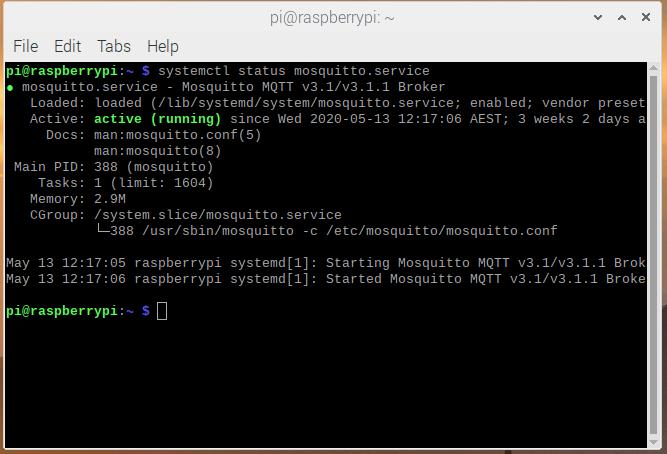
After all dependencies are fulfilled and the server is installed, you can check the status by running systemctl status mosquitto.service in a terminal.
Setting up Python
Because Python is what I’m using for making all my code in the course, I decided to use python for this project too. To have access to the MQTT server and client we just created in the RPi, we need to install some libraries and dependencies in our system.
sudo pip install paho-mqtt
paho-mqtt is a library that enables python with MQTT capabilities. To have a deep understanding of paho-mqtt please visit documentation in this link
Knowing your IP address
The most useful thing to do is to have a local static IP. This can be easily done by accessing your router or access point settings, and (if it is capable) assign a static IP to your RPi. However, because I don’t have a router with admin access, I had to use my iPhone Hotspot as an Access Point. The iPhone hotspot options are pretty limited, and instead of setting a static IP, I will have to look for the IP address every time I need to create a connection.
To know your IP address, in a terminal run ifconfig and you will see an output like this:
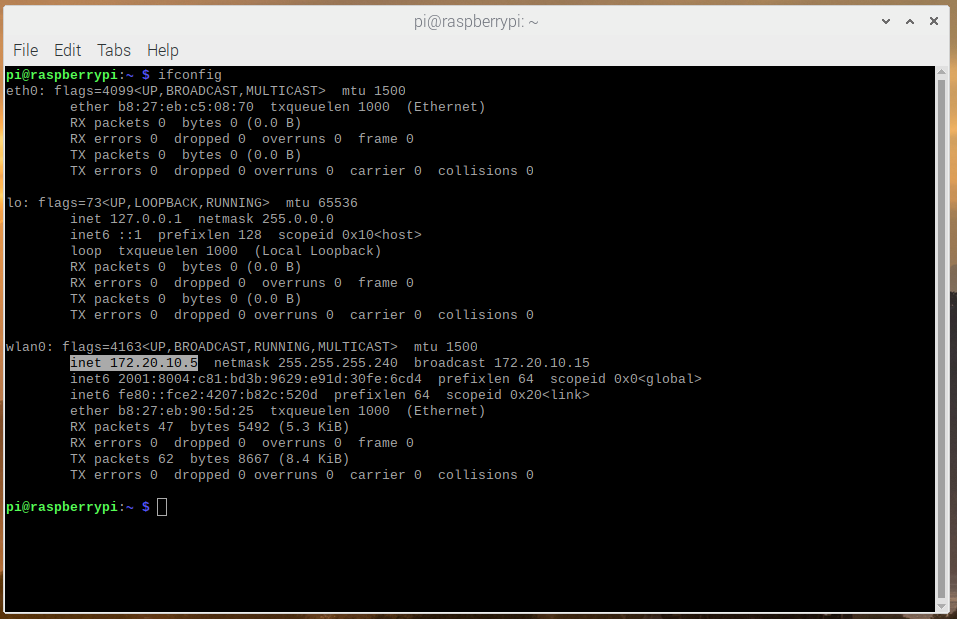
In our case, the WiFi interface is wlan0 and the IP address is 172.20.10.5
Huzzah Featherboard
For the Huzzah Featherboard, we are going to use Arduino IDE. Micro Python, the other option to program the board, might be able to handle MQTT client capabilities but I was not able to explore that option and hence chose to use Arduino IDE.
Before starting to program the board, I needed to include libraries and other dependencies in both Arduino IDE and my MacBook. To achieve this I simply followed Adafruit’s official guide which can be found here.
Another library that we need to install in Arduino IDE is Adafruit_MQTT. This enables the MQTT capabilities on the board.
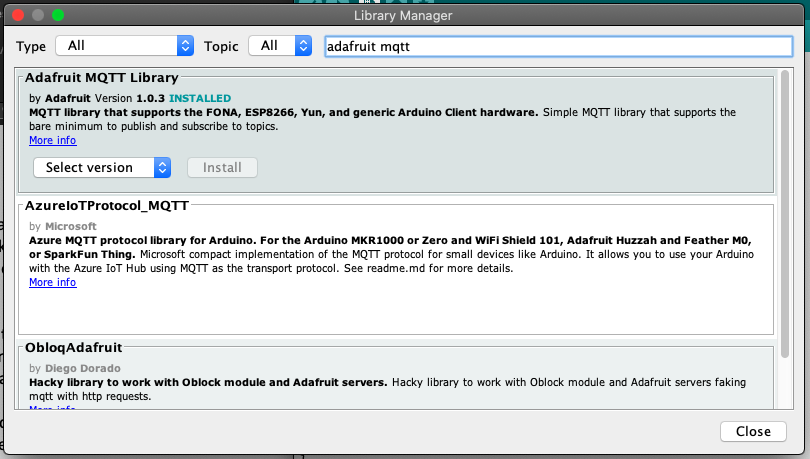
Once all dependencies are installed, we can move on to the actual program which will connect to a WiFi Network. Note that in the first step we are not making a program in the RPi but rather we are using some publish command in the terminal.
Connecting the Featherboard to WiFi
First, we need to set up the WiFi connection. We do that with this part of the code. Note that this code is only a test; the final version of code will be different.
/***************************************************
  Required libraries
****************************************************/
#include <ESP8266WiFi.h>
#include "Adafruit_MQTT.h"
#include "Adafruit_MQTT_Client.h"

/* WiFi Setup */
/************************* WiFi Access Point *********************************/
#define WLAN_SSID       "iPhone" //be sure to translate any special characters to "machine readable" language
#define WLAN_PASS       "password"


void setup() {
Serial.begin(9600);
 pinMode(0, OUTPUT);
  if(Serial){
    Serial.println("Serial initialized");
    }
 delay(10);

 Serial.println(F("RPi-ESP-MQTT"));
 // Connect to WiFi access point.
 Serial.println(); Serial.println();
 Serial.print("Connecting to ");
 Serial.println(WLAN_SSID);
 WiFi.begin(WLAN_SSID, WLAN_PASS);
 Serial.println(WiFi.status());
while (WiFi.waitForConnectResult() != WL_CONNECTED) {
   delay(500);
   Serial.print(".");
   Serial.println(WiFi.status());
 }
 Serial.println();
 Serial.println("WiFi connected");
 Serial.println("IP address: "); Serial.println(WiFi.localIP());

}

void loop() {
  Serial.println("...");  // The board will print three dots to the serial console of Arduino IDE
  delay(1000);

}
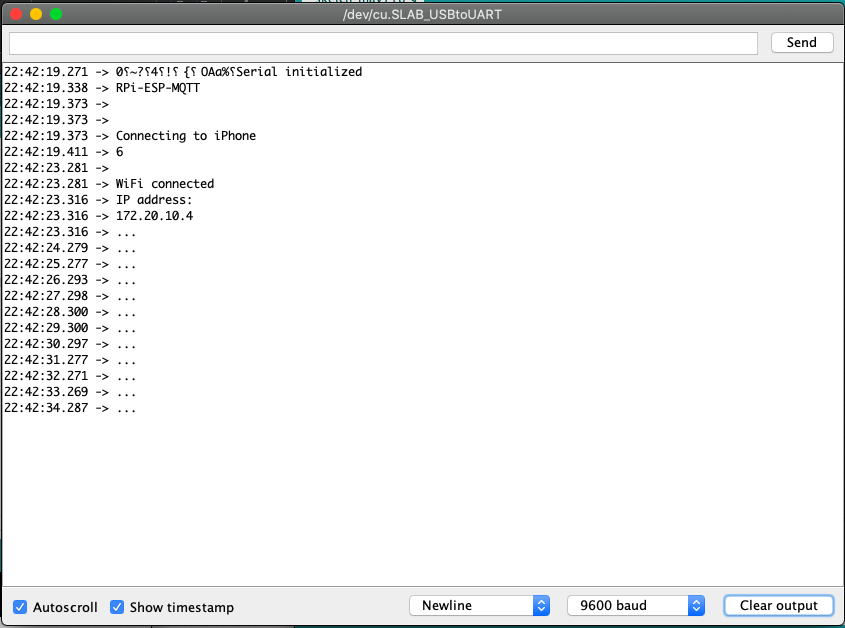
And the output in the serial console of Arduino IDE will look like this:
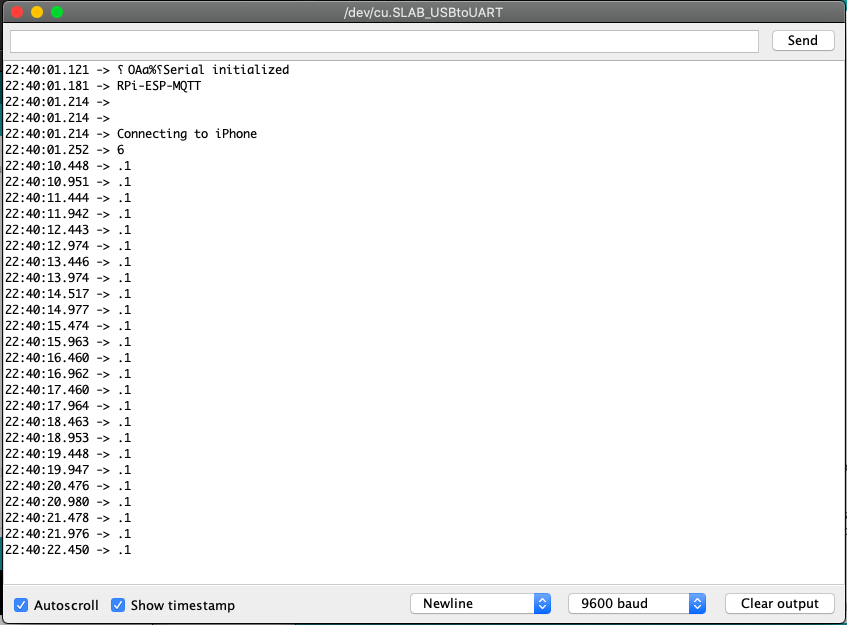
In the first attempt I forgot to turn on the iPhone hotspot and that’s it has a lot of “.1”, at first I didn’t recognize the error and looking at official documentation of the WiFi Status was not really helpful. A couple of Google searches after led me to this page with the WiFi Status in numbers.
Turning on the iPhone hotspot make the connection successful:
Connecting the Featherboard to RPI using MQTT
Once the connection with the WiFi network is done, we can start sending and receiving messages using MQTT.
We need to create a MQTT client class and use that to send and receive messages from the RPi. To add that to our code, we use:
// Create an ESP8266 WiFiClient class to connect to the MQTT server.
WiFiClient client;
// Setup the MQTT client class by passing in the WiFi client and MQTT server and login details.
Adafruit_MQTT_Client mqtt(&client, MQTT_SERVER, MQTT_PORT, MQTT_USERNAME, MQTT_PASSWORD);
/****************************** Feeds ***************************************/
// Setup a feed called 'pi_led' for publishing.
// Notice MQTT paths for AIO follow the form: username/feeds/feedname
Adafruit_MQTT_Publish pi_test = Adafruit_MQTT_Publish(&mqtt, MQTT_USERNAME "/test/pi");
// Setup a feed called 'esp8266_led' for subscribing to changes.
Adafruit_MQTT_Subscribe esp8266_test = Adafruit_MQTT_Subscribe(&mqtt, MQTT_USERNAME "/test/esp8266");
In void setup() we add:
// Setup MQTT subscription for esp8266_test feed.
 mqtt.subscribe(&esp8266_test);
We create the function MQTT_connect() to handle the connection:
void MQTT_connect() {
 int8_t ret;
 // Stop if already connected.
 if (mqtt.connected()) {
   return;
 }
 Serial.print("Connecting to MQTT... ");
 uint8_t retries = 3;
 while ((ret = mqtt.connect()) != 0) { // connect will return 0 for connected
      Serial.println(mqtt.connectErrorString(ret));
      Serial.println("Retrying MQTT connection in 5 seconds...");
      mqtt.disconnect();
      delay(5000);  // wait 5 seconds
      retries--;
      if (retries == 0) {
        // basically die and wait for WDT to reset me
        while (1);
      }
 }
 Serial.println("MQTT Connected!");
}
And lastly, in void loop() we add:
MQTT_connect();
 // this is our 'wait for incoming subscription packets' busy subloop
 // try to spend your time here
Adafruit_MQTT_Subscribe *subscription;
 while ((subscription = mqtt.readSubscription())) {
   if (subscription == &esp8266_test) {
     Serial.print(F("Got: "));
     Serial.println((char *)esp8266_test.lastread);
   }
 }
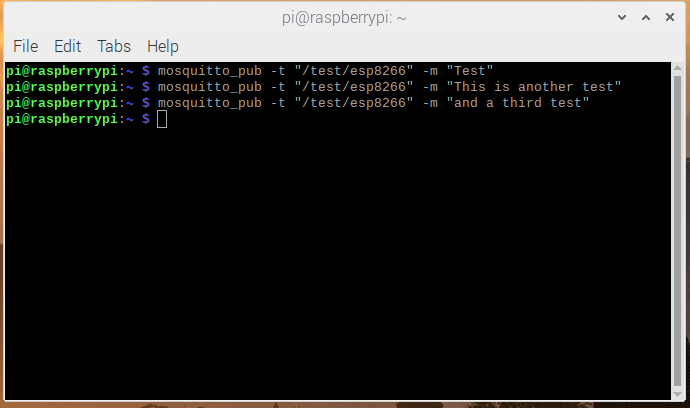
We run the updated code, and in out RPi, we run the next commands in a terminal:
mosquito_pub -t “/test/esp8266” -m “Test”
Where:
-t : Topic (Of the subscription)
-m : Message to send
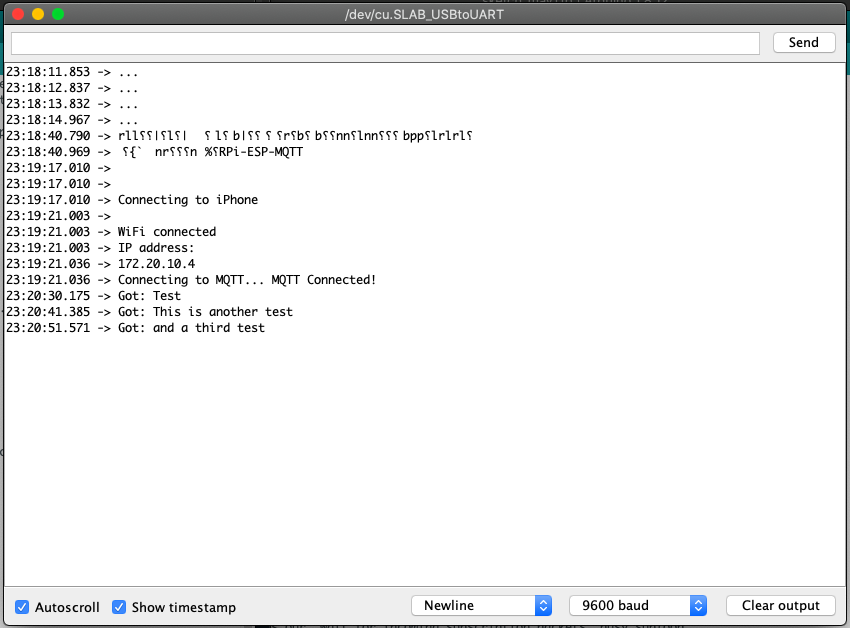
And we can see the message we send from the RPi into the Arduino IDE Serial Console:
Messages sent from Raspberry Pi:
Messages read in Arduino IDE Serial Console:
Once the communication is fully set up, we can start playing with other capabilities of potential IoT devices. For the purpose of this project, I will send the data from an external temperature sensor to te RPi using the Huzzah Featherboard as a bridge. The temperature can be graphed in a python program running in the RPi.
The external sensor is located in a third development board (Adafruit Circuit Playground Express), and the data is sent via UART to the Huzzah Featherboard. This data is then sent using WiFi to the RPi.
The code to get the temperature and send it via UART, from the CPE to the Huzzah Featherbord is:
# import required libraries
import adafruit_thermistor
import board
import busio
import time
from adafruit_circuitplayground import cp


# set up UART bus
uart = busio.UART(board.TX, board.RX, baudrate = 9600, parity = None, stop = 1, bits = 8, timeout = 2)

# main loop
while True:
    cp.red_led = True
    temp_c = cp.temperature
    print("Temperature is: %f C" % (temp_c)) # optional, to see what was sent thruogh UART
    data = str(temp_c) + '\n'
    uart.write(data.encode('utf-8'))
    print("UART: "+data)
    time.sleep(0.1)
    cp.red_led = False # make that LED blink
    time.sleep(0.4)
And in the Featherboard is like this:
String incoming_message = "";

void setup() {
 Serial.begin(9600);
  if(Serial){
    Serial.println("Serial initialized");
    }
 delay(10);
}

void loop() {
  // put your main code here, to run repeatedly:
  incoming_message = Serial.readStringUntil('\n');
  Serial.println("Received message: " + incoming_message);
}
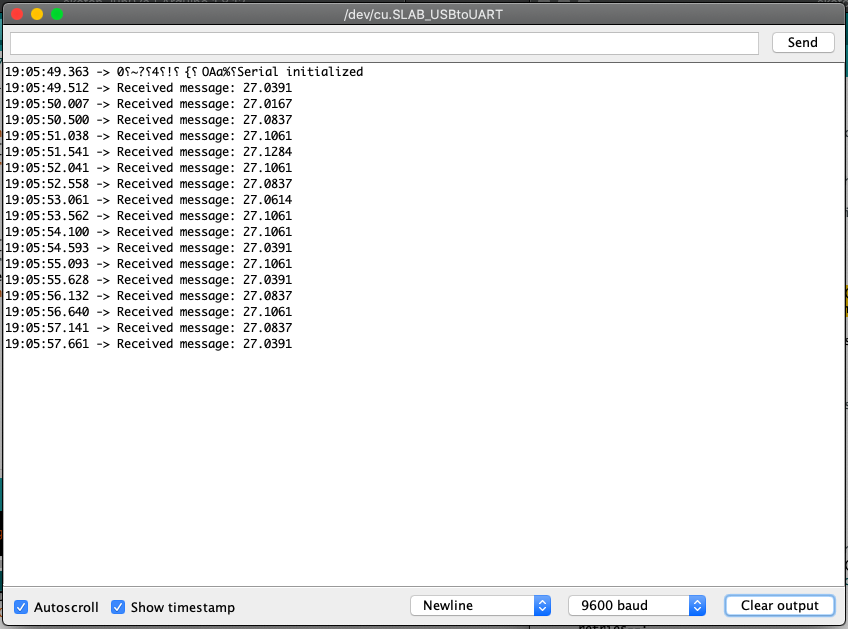
This code only reads the UART bus and prints the messages in the Serial console in Arduino IDE. The output will look like this:
And the whole system looks like this:
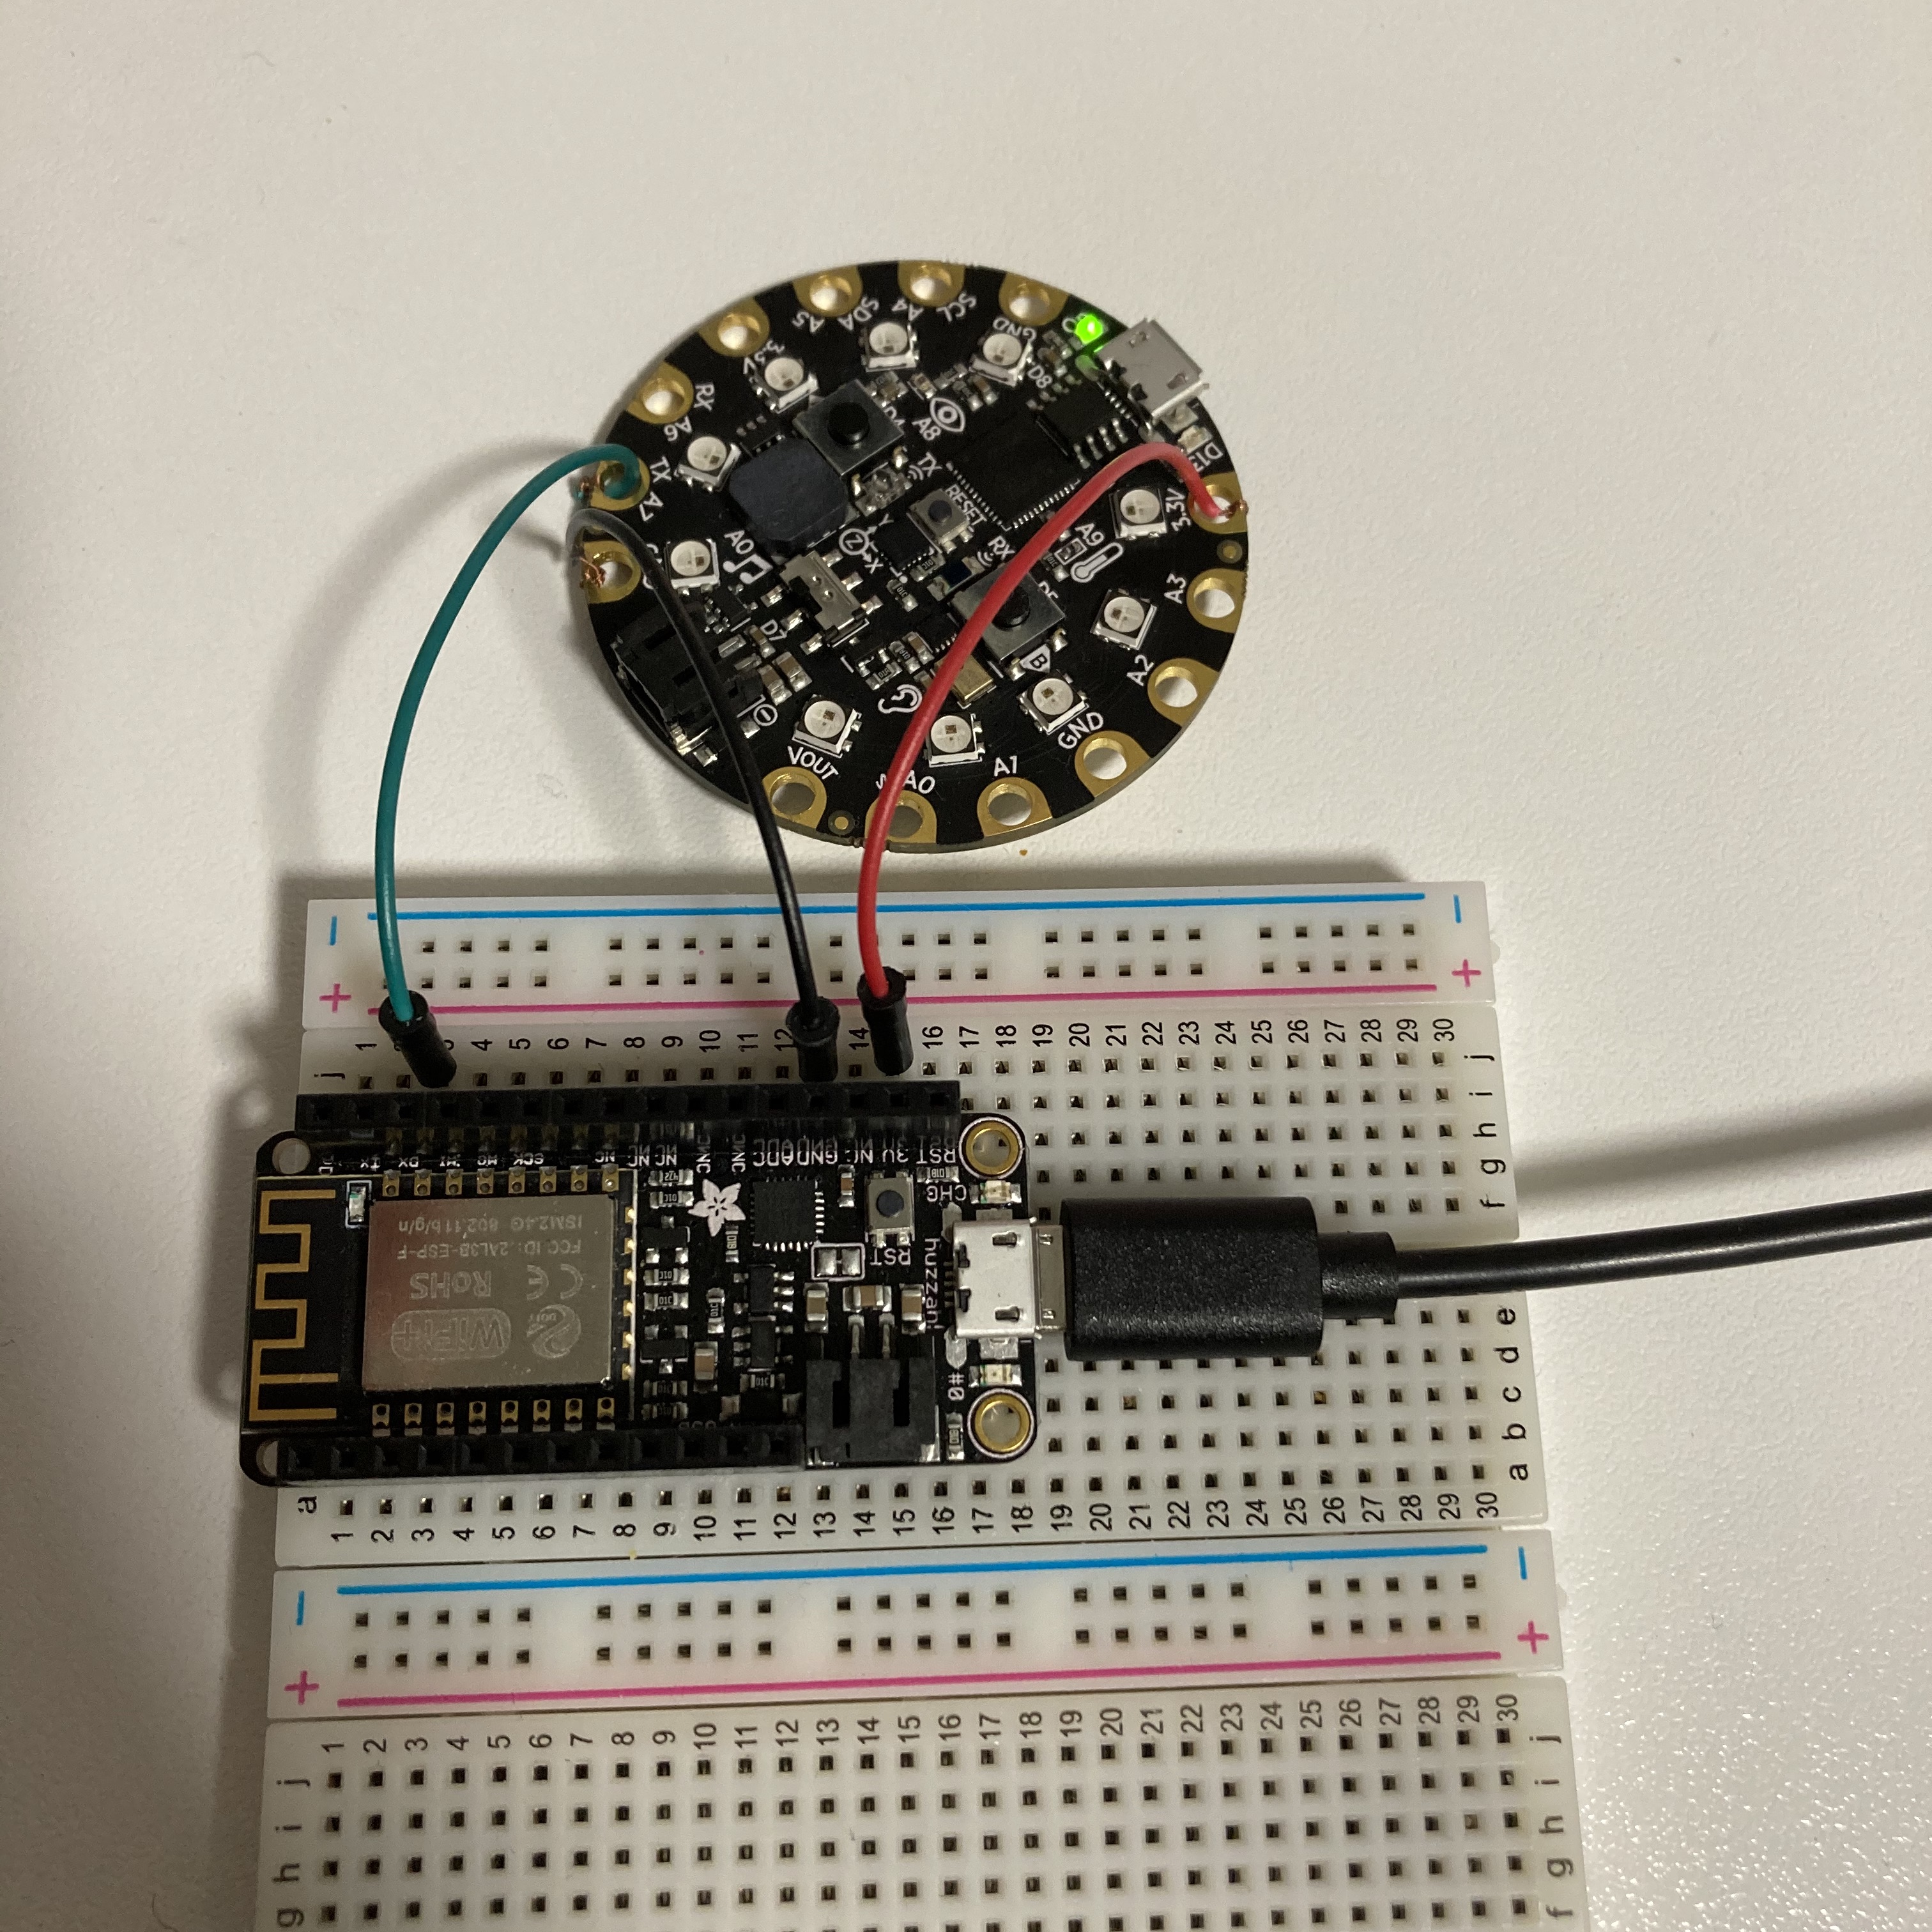
Note that in real life IoT applications all the sensors would be placed in a single board, including the WiFi and MQTT capabilities. This is only an example of what can be done with it.
Now that we have established a connection between the CPE Board and the Huzzah Featherboard, we can send that information to the RPi using MQTT. We merge both previous snippets and end up with:
#include
#include "Adafruit_MQTT.h"
#include "Adafruit_MQTT_Client.h"
/************************* WiFi Access Point *********************************/
#define WLAN_SSID       "iPhone"
#define WLAN_PASS       "password"
#define MQTT_SERVER      "172.20.10.5"  // give RPI static address
#define MQTT_PORT         1883
#define MQTT_USERNAME    ""
#define MQTT_PASSWORD         ""

String incoming_message = ""; // Variable to store incoming messages from UART

// Create an ESP8266 WiFiClient class to connect to the MQTT server.
WiFiClient client;
// Setup the MQTT client class by passing in the WiFi client and MQTT server and login details.
Adafruit_MQTT_Client mqtt(&client, MQTT_SERVER, MQTT_PORT, MQTT_USERNAME, MQTT_PASSWORD);
/****************************** Feeds ***************************************/
// Setup a feed called 'raspi' for publishing.
Adafruit_MQTT_Publish raspi = Adafruit_MQTT_Publish(&mqtt, MQTT_USERNAME "/test/pi");

/*************************** Sketch Code ************************************/
void MQTT_connect();

/********************** Execute this only once *****************************/
void setup() {
 Serial.begin(9600);
 delay(10);
 Serial.println(F("RPi-ESP-MQTT"));
 // Connect to WiFi access point.
 Serial.println(); Serial.println();
 Serial.print("Connecting to ");
 Serial.println(WLAN_SSID);
 WiFi.begin(WLAN_SSID, WLAN_PASS);
 while (WiFi.waitForConnectResult() != WL_CONNECTED) {
   delay(500);
   Serial.print(".");
 }
 Serial.println();
 Serial.println("WiFi connected");
 Serial.println("IP address: "); Serial.println(WiFi.localIP());
}
uint32_t x=0;

// Main loop (Similar to while(True) from Python)
void loop() {
   //Check for UART incoming messages and publish them to the MQTT feed
   digitalWrite(0,HIGH); // blink the board LED
   incoming_message = Serial.readStringUntil('\n');
   Serial.println("Message sent: " + incoming_message);
   raspi.publish((char*) incoming_message.c_str());
   digitalWrite(0,LOW);
   delay(500);

}

// Function to connect and reconnect as necessary to the MQTT server.
void MQTT_connect() {
 int8_t ret;
 // Stop if already connected.
 if (mqtt.connected()) {
   return;
 }
 Serial.print("Connecting to MQTT... ");
 uint8_t retries = 3;
 while ((ret = mqtt.connect()) != 0) { // connect will return 0 for connected
      Serial.println(mqtt.connectErrorString(ret));
      Serial.println("Retrying MQTT connection in 5 seconds...");
      mqtt.disconnect();
      delay(5000);  // wait 5 seconds
      retries--;
      if (retries == 0) {
        // basically die and wait for WDT to reset me
        while (1);
      }
 }
 Serial.println("MQTT Connected!");
}
Important note: Because we are using Serial communication to upload code to the Huzzah Featherboard, and to get data from CPE, it is mandatory to unplug the serial/uart wire from the Featherboard before uploading code or we will get a timeout error.
From the RPi side, the code looks like this:
#RPi
import time
import paho.mqtt.client as mqtt

# setup global variable to store data from MQTT
datas = ''

# connecting to the server or receiving data from a subscribed feed.
def on_connect(client, userdata, flags, rc):
   print("Connected with result code " + str(rc))
   # Subscribing in on_connect() means that if we lose the connection and
   # reconnect then subscriptions will be renewed.
   # subscription feed
   client.subscribe("/test/pi")

# The callback for when a PUBLISH message is received from the server.
def on_message(client, userdata, msg):
   # Update global variable
   # Be sure to use global variable or it won't get updated
   global datas
   data = msg.payload
   datastr = ''.join([chr(b) for b in data])
   datas = datastr
   return msg # This is not used


# Create MQTT client and connect to localhost
client = mqtt.Client()
client.on_connect = on_connect
client.on_message = on_message
client.connect('localhost', 1883, 60)

# Connect to the MQTT server and process messages in a background thread.
client.loop_start()

# Main loop to listen for Messages.

while True:
    #print("lalala\n") # debug line (delete from final code)
    time.sleep(0.2)
    print(datas) # Print the data sent from Temp Sensor
And the code running:
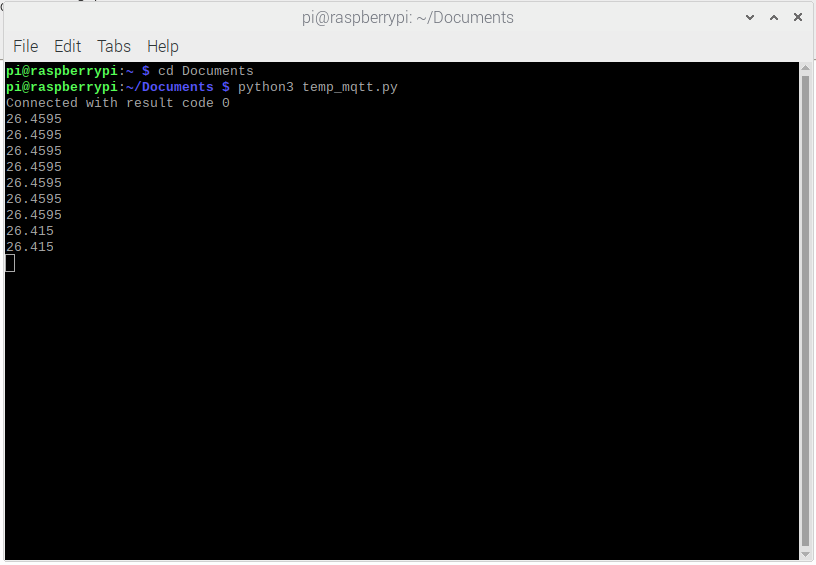
At this time, the temperature readings are only printed in the screen, but one thing that would be good to add is create a graph or chart where one could see how the temperature is changing in real time.
Conclussions and further development
The internet of things is one of those developments that, personally, are not very interesting for me. However, I do think that the imminent massification of these technologies offer an opportunity to understand how they work. This will enable practitioners of the new branch of engineering with the tools and methods that are more suitable to foresee their applications. One of the topics that, in my point of view, is crucial for the safe scalability of IoT is security. Adding more components to a network provides more points of entry for vulnerability attacks. I am not, by any means, suggesting that IoT is, by nature, insecure. But rather, offering another insight to keep in mind.
With the experimentation, I did during this entry I was able to understand how the packets are prepared, stored, and sent from one device to another. Also, I learned how to do programming in Arduino IDE, expanded my knowledge of Python, and did understand the basics of networking technology. The errors I encountered (such as the WiFi Status codes not being too explicit, or the wire connection that was preventing my code of being uploaded to the Huzzah Featherboard because is shared for UART) gave an opportunity to understand why those things were happening, where to look for information (Hint: Stack overflow do have many entries in almost every topic), and how to change my code to debug what was causing the errors I was encountering.
The experiments I made are not, by any means, an exhaustive exploration of all IoT network technologies that exist. This was only an example to learn about one specific wireless technology that can exist on top of other technologies such as WiFi. As stated before, there are other technologies that might be more or less suitable for other applications. As with everything in technology, there is not a wrong or right technology however, some of them are more suitable for our needs. We, practitioners of the new branch of engineering should always keep in mind the implications of one technology over others, when we are trying to create solutions.